You can create foreign keys using TSQL roughly the same way as you created primary keys. You can either use the ALTER TABLE statement to add the foreign key, or, if you already have the parent table created along with it’s primary key, you can use the CREATE TABLE statement to include foreign key constraints. The restrictions for creating foreign keys are still the same when using TSQL.
Adding a Foreign Key
Using the ALTER TABLE statement is very straight forward as before. This script will create a foreign key relationship between the Personnel.Person table and the Personnel.PersonAddress table:
ALTER TABLE Personnel.PersonAddress
ADD CONSTRAINT PersonAddress_FK_Person
FOREIGN KEY (PersonID)
REFERENCES Personnel.Person (PersonID);
The ALTER TABLE and ADD CONSTRAINT statements are the same as what you saw before. They respectively refer to the table being altered and provide a name for the new restraint. The FOREIGN KEY statement let’s you know what kind of constraint is being created. You have to define the column or columns that are being constrained. Finally, you use the REFERENCES statement to define which table is the parent in this relationship and what columns are being used as the key in the relationship.
If you wanted to remove this same constraint you would just use the ALTER TABLE statement again:
ALTER TABLE Personnel.PersonAddress
DROP CONSTRAINT PersonAddress_FK_Person;
Since it wasn’t specified one way or the other in the ALTER TABLE statement above that created the constraint, the data in the child table will be checked to ensure that it matches the data in the parent table appropriately. If you did wish to skip this check, again, not generally a good idea, you can modify the script as follows:
ALTER TABLE Personnel.PersonAddress WITH NOCHECK
ADD CONSTRAINT PersonAddress_FK_Person
FOREIGN KEY (PersonID)
REFERENCES Personnel.Person (PersonID);
Remember, this statement will not validate that the data in the table is correct when the constraint is created. Subsequent data that gets added will be checked. However, because the constraint was created without the check in the first place, the SQL Server process that optimizes queries will not consider this constraint when it builds its plans for executing queries which could cause a serious performance hit. That’s yet another reason why should, in most circumstances, allow the check of the data to occur.
If you did create a foreign key without the check, it is possible to rectify the situation. You just have to run another ALTER TABLE statement and tell SQL Server to perform the check as follows:
ALTER TABLE Personnel.PersonAddress
CHECK CONSTRAINT PersonAddress_FK_Person;
This will then validate that the data is correct and this index will again be trusted by the query optimizer.
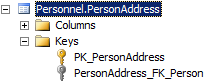
After you’ve created the foreign keys using TSQL, if you want to see them in the Object Explorer window, you will have to refresh the view. After doing so you’ll see that a foreign key created in this fashion will look exactly like those created using the GUI as shown here:
Conclusion
That’s pretty much it for using the ALTER TABLE statement to create a foreign key constraint. In the next blog post, we’ll again use T-SQL and the CREATE TABLE statement to make a foreign key.
Minor correction here. The terms “parent” and “child” tables is part of the old network database model, not part of RDBMS or SQL. We use “referenced” and “referencing” tables , which has nothing to do with pointer chains. It is also possible that a table can reference itself in RDBMS, but not in a network database. In fact, a self reference can be very handy trick.
Also, can any person be an element of Personnel or should the title of that kind of entity be “employee” or something else. If you allow outside services such as Kelly Girl to provide personnel?
Thanks Joe. I do fall back on that language when I really shouldn’t.